Many years ago, I used a VideoLabs "ClearOne" gooseneck mounted camera trying to fire up an ActionMedia 2 adapter. Unfortunately, the ClearOne has poor low-light response, and the images had purple speckles...
So after a bit, prices on PTZ cameras came down, making it reasonable to buy one used. A brand that has wide use, good tech support, and uses a industry standard protocol [VISCA] is Sony. Frugal PTZ cameras that use VISCA include the EVI-D30, -D70, and the -D100.
NOTE: Different models of the EVI-Dxx series can vary in supported command codes.
EVI-D70 Brochure
EVI-D70 Specifications
EVI-D70 Demo Software
CI-1000 User's Manual
EVI-HD1 Technical Manual
libvisca-1.1.1.tar.gz VISCA camera control library - Original HERE
"libVISCA is a library for controlling a VISCA compliant video camera. VISCA is a professional camera control protocol, designed by Sony to be used on several of its surveillance and OEM block cameras."
ALPHA version of VISCA protocol PS/2 RS-232 port control app
EVID70_T.BAS Versions
Creating Boot Floppy / Test Program Diskette on Win7 [Windows Seven]
Model 90 DB9 Serial Port Setup [Planar Device 6 – Serial Port No. 2]
EVID70_T.BAS version 03 Output
Keyboard PTZ Control Keys
EVI-D70 Rear Panel
VISCA RS-232C IN Port Pin Assignment
VISCA RS-422 Port Pin Assignment
Sony RM-EV100 IR Remote Commander
EVI-D70 Bottom Switch
Serial Port to VISCA Mini-DIN Cable
DB9 Female Terminal
VISCA Removable Terminal Block
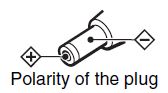
AC Power Adapter (MPA-AC1)
ALPHA version of VISCA protocol PS/2 RS-232 port control app
WBST has an -- ALPHA -- version of a SONY VISCA protocol PTZ camera controller via an RS-232 serial port.
"The test program is still too basic (excuse the pun) for publication. It needs someone with the hardware to do some testing to verify operation. Only then can we look into a proper TSR or device driver to operate in co-existence with a video display application, if that was the final intended purpose."
EVID70_T.DSK 11/01/2019 PS/2 RS-232 serial port control software for VISCA compliant PTZ This is the bootable QBASIC test application diskette.
EVID70_T.BAS Versions You can try different versions by adding EVID70_T.BAS to the EVID70_T diskette. Rename the original EVID70_T.BAS before copying the newer version to the EVID70_T diskette...
EVID70_T_03.BAS 10/21/2019
EVID70_T_04.BAS 10/23/2019
EVID70_T_05.BAS 11/01/2019 <<< Latest version
EVID70_T versions prior to 03 were removed. They are alpha code, and are not reliable.
WBST:
"Still refining a little and will send *revision* (not version, yet. Would be .100 for Version 1 Release 0 Revision 0) 005 and a refresh of the .DSK image (clean up etc.) as soon as feasible, to include the EVID70_R.BAS "D70 emulator" and all revisions 003 thru 005 (all in text format, due to QuickBASIC 4.5's Fast Save+Load format problem) too."
LOADDSKF
LOADDSKF instructions
Creating Boot Floppy / Test Program Diskette on Win7 [Windows Seven]
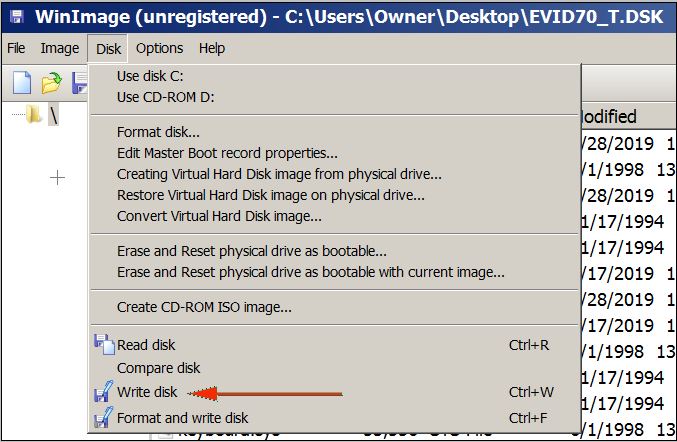
winima90.exe (http)
http://www.winimage.com/download/winima90.exe
Contains WinImage 9.00 32 bits Intel/AMD version in English for Windows Windows XP, Windows 2003/2008 server, Windows Vista, Windows Seven, along with the WinImage self-extractor.
File [choose *.DSK], then choose Disk > Write Disk. Created diskette has 1.0MB used [1,048,576] and 399KB free [409,088].
NOTE: The DSK won't fit if you SIMMply copy it to a floppy
Here is where the program could be clearer by adding "A:" or "Floppy" to the menu line.
What do I run to get EVI-D70_T.BAS to run?
WBST said:
After booting to the A:\> prompt, enter TEST to start. Wait.....
.............................
while QB 4.5 loads and then loads EVID70_T.BAS and the QBSER.QLB library.
Then, initially, press F5 to try it out. If it seems to hang after more than 3 seconds pressing CTRL+Break should return you to the QuickBASIC 4.5 screen.
Model 90 DB9 Serial Port Setup [Planar Device 6 – Serial Port No. 2]
Some clarification, the "Serial Port" in "Built In Features" is the DB25. Es la verdad, as I am using the Sony DB9 VISCA cable [SONY P/N RC9P3 or RC893/1].
Disable DB25 Serial Port
Built In Features
Installed Memory. . . . . . . . . . . . : nnnnKB (nn.nMB)
Diskette Drive 0 Type . . . . . . . . . : 1.44MB 3.5”
Diskette Drive 1 Type . . . . . . . . . : Not Installed
Diskette Drive 2 Type . . . . . . . . . : Not Installed
Math Coprocessor. . . . . . . . . . . . : Installed
Display F1 prompt to access System Pro. : Yes [T4 only?]
Serial Port . . . . . . . . . . . . . : Disabled [NOTE: DB25 port!]
Serial Transmit Arbitration Level . . . : Disabled [NOTE: DMA not used!]
Serial Receive Arbitration Level. . . . : Disabled [NOTE: DMA not used!]
Enable DB9 Serial Port
Planar Device 6 – Serial Port No. 2
Serial Port . . . . . . . . . . . . . : SERIAL 1 [NOTE: DB9 port!]
Serial Transmit Arbitration Level . . . : Disabled [NOTE: DMA not used!]
Serial Receive Arbitration Level. . . . : Disabled [NOTE: DMA not used!]
EVI-D70_T.BAS Serial Port Settings
Serial 1 / 03F8 IRQ4 or Serial 2 / 02F8 IRQ3
NOTE: Type 1 and Type 2 serial controllers are fixed to Serial 1 at 03F8 IRQ4, or Serial 2 / 02F8 IRQ3. Type 3 serial controllers can choose between IRQ 3 or IRQ 4.... If you select other than Serial 1 or Serial 2, the I/O addresses WILL change!
Arbitration (only required by DMA access) is not implemented in the package. Those settings aren't used or required.
Model 90
Serial Port Settings from Type 4 Refdisk PFF6F.ADF
|
Serial |
Compatible |
Extended |
Int |
|
1 |
03f8h-03ffh |
083f8h-083ffh |
int 4 |
|
2 |
02f8h-02ffh |
082f8h-082ffh |
int 3 |
|
3 |
3220h-3227h |
0b220h-0b227h |
int 3 |
|
4 |
3228h-322fh |
0b228h-0b22fh |
int 3 |
|
5 |
4220h-4227h |
0c220h-0c227h |
int 3 |
|
6 |
4228h-422fh |
0c228h-0c22fh |
int 3 |
|
7 |
5220h-5227h |
0d220h-0d227h |
int 3 |
|
8 |
5228h-522fh |
0d228h-0d22fh |
int 3 |
NOTE: Choosing to enable "Serial Transmit Arbitration Level" and "Serial Receive Arbitration Level" sets the Serial Port into "Extended Mode". "Extended Mode" either adds or shifts the I/O addresses, you don't want or need that...
EVID70_T.BAS version 03 Output
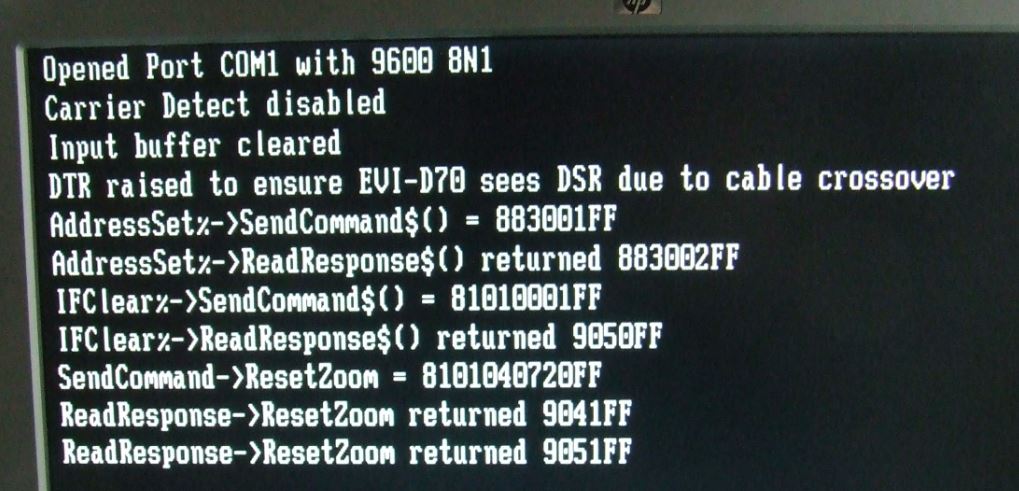
Version 3 actually works... I was so surprised that I didn't even try using the arrow keys until Lorenzo told me his was moving. Both the Numeric pad AND the four arrow keys all control the PTZ.
When using the test program, do not hold the arrow down, just press and release. The test program at this time is biased towards "proof of concept" where you send a command, the PTZ acknowledges, and the PTZ performs the command. It is "laggy".
Test program Useful environment usage:
To start EVID70_T.BAS, boot with EVID70 floppy, Alt-R at main screen, choose Start.
S Set Configuration
R Run Main Loop [NOTE: use X to exit]
Q Quit [application]
S Set Configuration brings up:
S Serial Port [1 or 2] Choose SERIAL 1 or SERIAL 2. Disable any Arbitration Levels.
B Baud Rate (9600 or 38400] NOTE: Bottom switch on EVI must agree!
X Exit setup
Errata -
To be implemented later, not in EVID70_T_03.BAS
F6 - rotates thru the 2 or 3 (if Help window active) windows:
Program -> Immediate (-> Help) -> Program ...
Esc - dismiss Help window (Tab works thru clickable links, first char of these also does something similar)
Shift F1 - Activate Help window
F4 - Display program output screen - any key to exit back (unless input req.d)
F5 - Run program
F8 - In program window, single-step each BASIC line
F9 - In program window, set breakpoint at cursor line
Keyboard PTZ Control Keys
WBST - "Revision 005 adds Home/End and PgUp/PgDn key support"
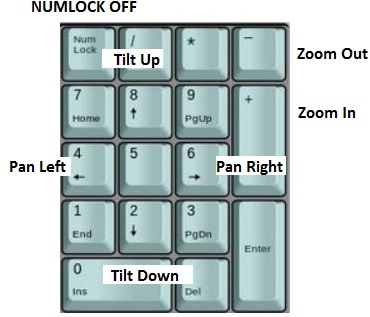
KeyPad 8 - Tilt Up
KeyPad 2 - Tilt Dn
KeyPad 4 - Pan Left
KeyPad 6 - Pan Right
KeyPad 7 - Tilt Up+Pan Left (ditto Home key)
KeyPad 9 - Tilt Up+Pan Right (ditto PgUp key)
KeyPad 1 - Tilt Dn+Pan Left (ditto End key)
KeyPad 3 - Tilt Dn+Pan Right (ditto PgDn key)
What about KeyPad 5?
WBST - No, it's not an Extended key if NUMLOCK ON, no function otherwise.
Alt+A (Reset PT&Z to Home)
Alt+H (Home Pan & Tilt)
Alt+R (Home Zoom)
EVI-D70 Rear Panel
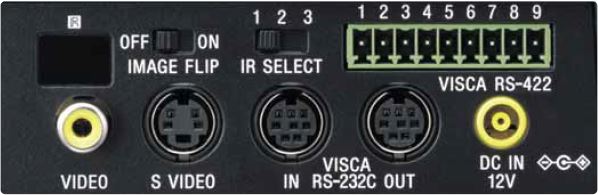
Sensor for the Remote Commander
IMAGE FLIP switch
Flips the image upside down. Normally set this to OFF when you use the camera. When the camera is attached to the ceiling, set this to ON. When you switch this, the pre-set setting is returned to the initial setting. It takes about 7 seconds for the image displayed to respond to the setting change.
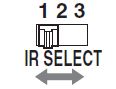
IR SELECT switch
Selects the camera number when you operate multiple cameras with the same Remote Commander
VISCA RS-422 connector
A VISCA RS-422 connector plug is attached to the unit at the factory.
NOTE: See VISCA Removable Terminal Block
NOTE: Do not make VISCA RS-232C and RS-422 connections at the same time, as this
may cause malfunctions.
VIDEO (output) connector
S VIDEO (output) connector
VISCA RS-232C IN connector
VISCA RS-232C OUT connector
DC IN 12V connector
VISCA RS-232C IN Port Pin Assignment
EVI-D70 Technical Manual page 35. It is a "crossover" cable...
| VISCA RS-232C IN Port | VISCA Pinout |
||||||||||||||||||||
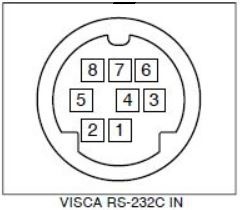 |
|
||||||||||||||||||||
| VISCA RS-232C IN Port | PS/2 DB9 Serial Port | ||||||||||||||||||||||
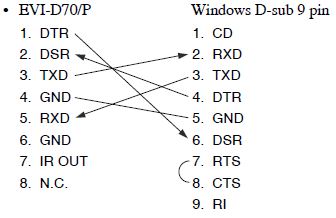 |
|
||||||||||||||||||||||
| VISCA RS-232C IN Port | PS/2 DB25 Serial Port | ||||||||||||||||||||||||||||||||||||||||||||||||||||||||||||
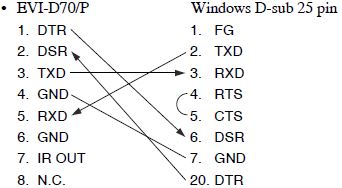 |
|
||||||||||||||||||||||||||||||||||||||||||||||||||||||||||||
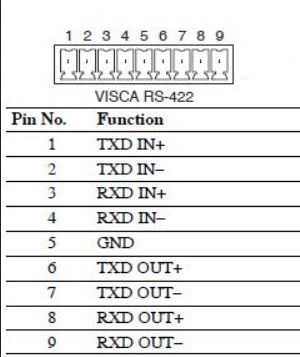
VISCA RS-422 Port Pin Assignment
| VISCA RS-422 Port | RS-422
Protocol Pinout |
 |
 |
NOTE: It looks like pins 1-4 are needed for a one PTZ configuration, pins 6-9 are needed for daisy-chaining the next PTZ(s). No idea yet if pin 5 Ground goes to the PC / controller?
Sony RM-EV100 IR Remote Commander
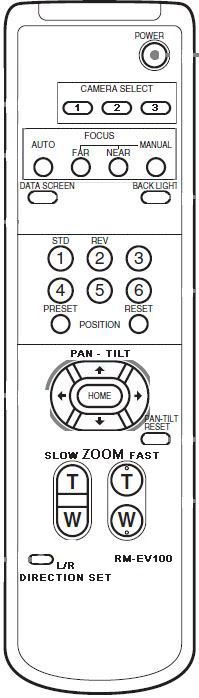 |
POWER
button CAMERA SELECT buttons FOCUS buttons DATA SCREEN button BACK LIGHT button POSITION buttons PAN-TILT buttons PAN-TILT RESET button ZOOM buttons L/R DIRECTION SET button |
POWER
When power is turned on, the camera automatically faces toward the upper left-hand side, and then the front, which is the home position of the camera. (Pan/tilt reset action)
CAMERA SELECT - Operating more than one camera with the Remote Commander
1 Set IR SELECT switch of the camera(s) which you intend to operate to 1, 2 or 3.
2 Press a CAMERA SELECT button on Remote Commander which corresponds to the number set in step 1.
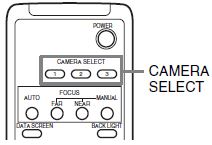
Then, you can operate the camera(s) specified by number. Every time you operate the camera(s) using the Remote Commander, the CAMERA SELECT button pressed in step 2 lights up.
FOCUS
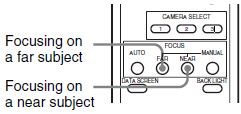
AUTO - Automatically focus camera on a subject
Press AUTO button. The camera focuses on subject at center of screen automatically.
MANUAL - Manually focus camera on a subject
FAR - Press MANUAL button, then press FAR button
NEAR - Press MANUAL button, then press NEAR button
DATA SCREEN
When the DATA SCREEN button is pushed, the camera status is displayed when you are using the Zoom or Manual Focus functions.
DATA SCREEN can be set to ON or OFF, and memorized, only with POSITION 1.
When POSITION 1 is recalled, the memorized DATA SCREEN status is used.
BACK LIGHT
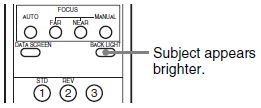
When you shoot a subject with a light source behind it, the subject becomes dark. In such
a case, press the BACK LIGHT button.
To cancel the function, press the BACK LIGHT button again.
POSITION
PAN-TILT Change directions of the camera head.
While checking the picture on the screen, press the desired arrow button.
To move the camera little by little, press the button just for a moment.
To move the camera in a wide range, press and hold down the button.
To move the camera diagonally, press the arrow button ( ▲ or ▼ ) while
holding down the arrow button ( ◄ or ).
To face the camera back to the front Press the HOME button
PAN-TILT RESET If you accidentally move the camera head with your hand
Pan and tilt angles differ from the camera’s normal position.
Press PAN-TILT RESET button, or turn POWER OFF once, then turn it ON again.
ZOOM Press either of the four ZOOM buttons
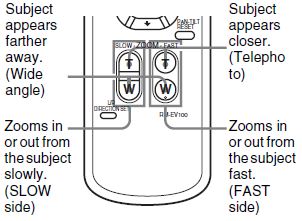
NOTE: When you perform a pan/tilt operation while in the telephoto mode, the moving speed of the image on the screen may be a little jerky.
NOTE: The SLOW zoom buttons are level, while the FAST zoom buttons are angled into the hand unit.
L/R DIRECTION SET When the camera is facing in the wrong direction
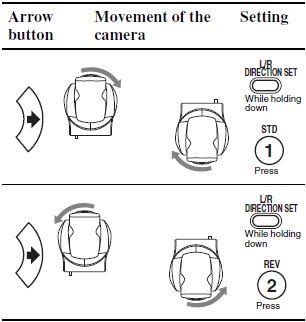
The camera is preset to face toward the right whenever the arrow ► button is pressed.
You might wish to face the camera toward the opposite direction from that of the button you pressed. In such a case, you can change the direction of the camera while checking the picture on the screen.
To do so, press the REV button while holding down the L/R DIRECTION SET button.
To reset that setting, press STD button while holding down L/R DIRECTION SET button.
EVI-D70 Bottom Switch

NOTE: The 4 position DIP switch is TEENY-TINY!!!
If you move the switch when powered on, the D70 keeps the current settings until the next power-on.
D30 Mode
IR Out
RS-422 / RS-232C
38400 bps / 9600 bps
SONY P/N RC9P3 or RC893/1
Apple Macintosh - 8 pin 6 foot serial printer cable
You need the end with the pins [male]
DB9 Female Terminal
If you search for "DB9 Female Terminal" you will get hits on flea buy.
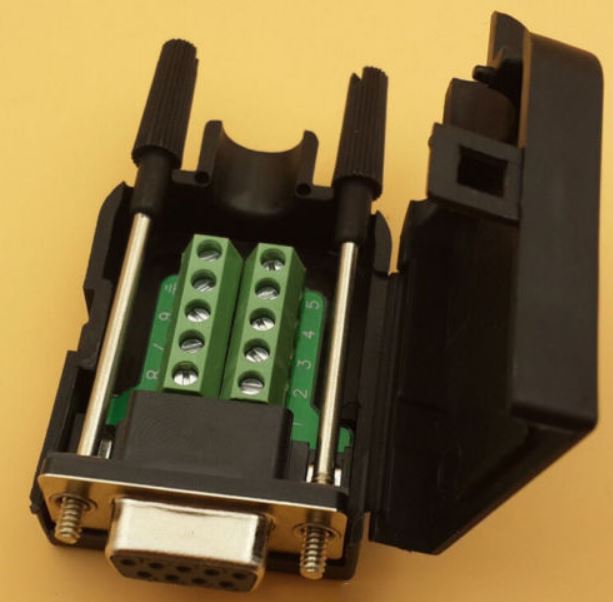
VISCA Removable Terminal Block

MINI COMBICON connectors, 3.5mm pitch
Pluggable Terminal Block, 3.5 mm, 9 Positions, 28AWG to 16AWG, 1.5 mm², Screw, 8 A
Phoenix P/N 1840434 or [obsolete] AK1550/9-3.5-GREEN or 51550090001D
AC Power Adapter (MPA-AC1)