|
Parallel-Port Compatibility Mode Assigning Parallel Ports Viewing Parallel-Port Assignments Changing Parallel-Port Assignments Configuring the Serial Ports Assigning Serial Ports Viewing Serial-Port Assignments Changing Serial-Port Assignments Configuring the Parallel Ports The system programs allow you to view and change parallel port assignments. Go to Viewing Parallel-Port Assignments for the procedures to view and change parallel port assignments. The parallel ports are most often used to communicate with parallel printers; however, parallel communications is an effective method of communicating with a variety of parallel devices. The parallel ports can send and receive data. Although the parallel ports have 25 pins, only eight of them are used to transfer data; the rest are used for status and control functions. Your system is equipped with two parallel ports; one standard port (port B), and one ExpressPrint(*), port (port A). If you are going to use a local printer dedicated to one system only, connect the printer to the standard parallel port. If you are going to share the printer with other computers connected to a network, using the standard parallel port can greatly reduce the speed that the information is sent to your local printer. However, if you attach the shared printer to the ExpressPrint port, the speed won't be affected. Notes:
Subtopics:
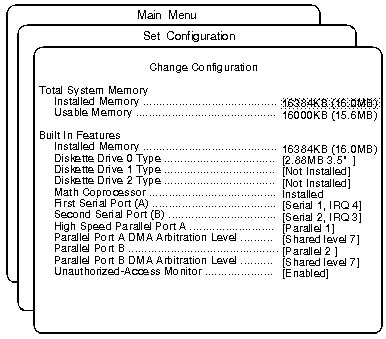
Parallel-Port Compatibility Mode The sending and receiving of data is called bidirectional communications. You can disable bidirectional parallel communications by using the Change Configuration program. When bidirectional parallel communications are disabled, the parallel port is in the compatibility mode. The term "compatibility" is a bit misleading because it has very little to do with the parallel port being compatible with hardware or software. As used here and in the system-program help messages, it means only that the parallel port operates like the one used in earlier personal computer models. Assigning Parallel Ports Software recognizes parallel ports by their parallel port assignments. No two parallel ports can have the same parallel-port assignment. This is normally handled by the Automatic Configuration program, but you might have special hardware or software that requires you to change these assignments. You can set the parallel ports as Parallel 1, 2, 3, or 4, through the system programs. At the time of shipment, the high-speed parallel port is set as parallel 1, and the standard parallel port is set as parallel 2. Many operating systems and application programs have a setup program that defines the location of the printer and the type of printer attached. Many use LPT (for line printer) to refer to parallel 1. If you are not sure of your parallel-port assignments, you can use the system programs to view them. Viewing Parallel-Port Assignments To view a parallel-port assignment: 1. Turn on the system. When the F1 prompt appears, press F1. The system programs Main Menu appears. Note: For disk-array models, insert the Reference Diskette into the primary diskette drive, then turn on the system. Or, if the system is turned on already, insert the Reference Diskette and press Ctrl+Alt+Del. 2. Select Set configuration from the Main Menu. 3. Select View configuration.
The standard parallel port is listed on the screen
under "Built In Features." You cannot change the parallel-port assignment
from this menu.
Changing Parallel-Port Assignments To change a parallel-port assignment: 1. Turn on the system. When the F1 prompt appears, press F1. The system programs Main Menu appears. Note: For disk-array models, insert the Reference Diskette into the primary diskette drive, then turn on the system. Or, if the system is turned on already, insert the Reference Diskette and press Ctrl+Alt+Del. 2. Select Set configuration from the Main Menu. 3. Select Change configuration.
4. Use the Up Arrow key or the Down Arrow key to highlight the
parallel-port assignment. Use F5 and F6 to scroll through the list
of available choices and make a selection. If the parallel-port assignment
conflicts with another assignment, an asterisk appears next to the conflicting
setting. You must change one of the conflicting settings to a nonconflicting
value.
Configuring the Serial Ports The system programs allow you to view and change serial port assignments. Go to Viewing Serial-Port Assignments for the procedures to view and change the serial port assignments. Serial ports provide an effective way of communicating with a variety of serial devices, such as serial plotters and printers. You also can use them to set up communications between two computers, using a null modem, or over telephone lines, using a modem. The serial port sends and receives data 1 bit at a time, as opposed to the parallel port, which sends and receives 8 bits at a time. The serial port can transmit data at speeds ranging from 300 to 345600 bits per second. The bits-per-second measurement is commonly referred to as the baud rate. Your system comes with two 9-pin serial ports. Additional serial ports can be added by installing a serial adapter in one of the expansion slots. Note: If you experience a problem with a non-IBM device when attaching it to the serial port, you might need to set the serial port DMA (direct memory access) arbitration level to "Disabled". See Changing the Configuration. Subtopics:
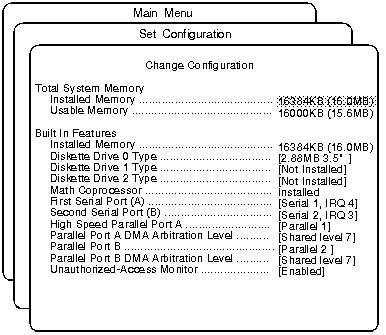
Assigning Serial Ports Software recognizes serial ports from their serial-port assignments. No two serial ports can be set the same. This normally is handled by the Automatic Configuration program, but you might have special hardware or software that requires you to change these assignments. You can set either serial port as Serial 1 through Serial 16 by using the system programs. Many operating systems and application programs have a setup program that defines the location and speed (baud rate) of a modem, or the location and type of serial printer. Many use "COM" (short for "Communications") to refer to the serial ports. For example, COM1 is the equivalent of Serial 1. If you are not sure of your serial-port assignments, you can use the system programs to view them. Viewing Serial-Port Assignments To view a serial-port assignment: 1. Turn on system. When F1 prompt appears, press F1. System programs Main Menu appears. Note: For disk-array models, insert Reference Diskette into primary diskette drive, then turn on system. Or, if system is turned on already, insert Reference Diskette and press Ctrl+Alt+Del. 2. Select Set configuration from the Main Menu. 3. Select View configuration.
The serial port is listed on the screen under "Built
In Features." You cannot change the serial-port assignment from this
menu.
Changing Serial-Port Assignments To change a serial-port assignment: 1. Turn on the system and when the F1 prompt appears on the screen, press F1. The system programs Main Menu appears. Note: For disk-array models, insert the Reference Diskette into the primary diskette drive, then turn on the system. Or, if the system is turned on already, insert the Reference Diskette and press Ctrl+Alt+Del. 2. Select Set configuration from the Main Menu. 3. Select Change Configuration.
4. Use the Up Arrow key or the Down Arrow key to highlight the
serial-port assignment. Use F5 and F6 to scroll through the list
of available choices and make a selection. If the serial-port assignment
conflicts with another assignment, an asterisk appears next to the conflicting
setting. You must change one of the conflicting settings to a nonconflicting
value.
|